How to Fix Sagging Drywall Ceilings: A Guide for Calgary Homeowners

Sagging drywall ceilings can be an eyesore and a sign of underlying issues. Whether it's due to moisture, improper installation, or aging materials, a drooping ceiling not only looks bad but can also pose safety risks. At Calgary Drywallers, we specialize in drywall repair, and today, we’re breaking down how you can address sagging drywall ceilings safely and effectively.
1. Identify the Cause of Sagging
Before starting any repair, it’s essential to figure out why your ceiling is sagging. Some common causes include:
- Moisture Damage: Leaks from above, high humidity, or plumbing issues can weaken the drywall, leading to sagging.
- Improper Installation: If screws or nails weren't used correctly or weren’t sufficient to hold up the drywall, sagging can occur over time.
- Aging or Wear and Tear: Drywall materials naturally weaken over time, especially in older homes.
- Insulation Issues: Heavy or poorly installed insulation can put extra pressure on the ceiling, causing sagging.
Understanding the cause helps you decide on the best repair approach and prevents future issues.
2. Gather the Right Tools and Materials
Repairing a sagging ceiling requires the right tools to ensure a sturdy, lasting fix. Here’s what you’ll need:
- Ladder or scaffolding for safe access to the ceiling
- Drywall screws, ideally 1-¼ inch or longer
- Cordless drill or screwdriver
- Utility knife and a drywall saw
- Joint compound and putty knife
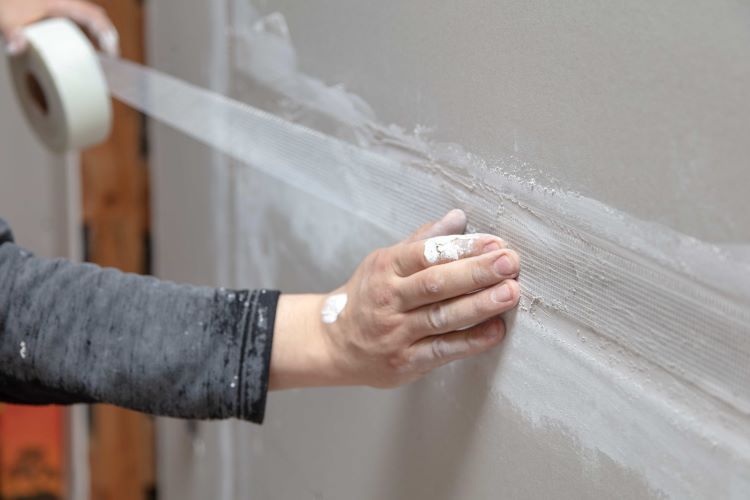
- Drywall tape
- Sandpaper (120- to 150-grit)
- Paint and primer to match the ceiling’s finish
3. Remove Damaged Sections (If Necessary)
- If the drywall is only slightly sagging, you may be able to reinforce it without cutting out large portions. However, if there’s visible water damage, mold, or if the drywall is too damaged, you’ll need to remove the affected areas.
- Using a utility knife or drywall saw, carefully cut around the damaged area. Always wear protective gear, as drywall dust can be irritating.
- If there’s mold, consider contacting a professional, as mold spores can affect indoor air quality.
4. Add Support to the Existing Drywall
- Use drywall screws to resecure any sagging sections. Insert screws along the existing joists or furring strips every 6–8 inches to pull the drywall up tightly against the ceiling.
- If the ceiling lacks adequate support, consider installing furring strips or adding additional framing for reinforcement.
5. Patch or Replace the Drywall Section
- For minor sagging, reinforce the area with additional screws as described. For larger repairs, cut a new drywall piece that fits the hole you removed. Secure it to the joists with screws.
- Apply drywall tape along the seams between the new drywall piece and the existing ceiling.
6. Apply Joint Compound and Smooth the Surface
- Use a putty knife to spread a thin layer of joint compound over the taped seams. Feather the edges to blend the new section with the old.
- After the first layer dries, lightly sand it down, then apply a second coat if needed. Continue sanding until the surface is smooth.
7. Prime and Paint the Ceiling
- Prime the repaired area to seal it and prevent moisture from penetrating the drywall. This is especially important in areas with high humidity.
- Once the primer is dry, paint the ceiling to match the surrounding area. Using high-quality ceiling paint helps ensure a seamless finish.
8. Prevent Future Sagging
To avoid future issues, consider the following preventative tips:
- Inspect for Leaks Regularly: Check for leaks in plumbing or roofing, especially after heavy rain or snow.
- Control Indoor Humidity: Use a dehumidifier if necessary, especially in moisture-prone areas like bathrooms and basements.
- Ensure Proper Insulation Installation: If your ceiling has insulation, make sure it’s installed correctly to avoid excess weight.
When to Call a Professional
While minor sagging can often be fixed with basic tools, larger issues may require the help of a professional drywall repair service. If you’re dealing with significant water damage, mold, or structural issues, it’s best to call in the experts.
At Calgary Drywallers, we have extensive experience in addressing sagging ceilings and other drywall issues across Calgary. We understand the unique climate challenges here and provide long-lasting solutions to ensure your home looks its best.
Conclusion
Fixing a sagging drywall ceiling can be a manageable DIY project if you follow the steps carefully and have the right tools. However, when in doubt, remember that professionals can ensure a safe, effective, and aesthetically pleasing repair. If you’re dealing with sagging ceilings or any other drywall concerns, contact Calgary Drywallers for expert guidance and solutions.
You might also like