How Many Coats of Mud Do You Need for Perfect Drywall?

When it comes to achieving that flawless drywall finish, one of the most important steps is applying the right number of coats of drywall mud, also known as joint compound. At Calgary Drywallers, we understand that a smooth, seamless wall is key to a professional finish, and knowing how to properly apply drywall mud plays a big part in that.
But how many coats of mud do you actually need for perfect drywall? The answer depends on the condition of the drywall, the type of mud being used, and your desired finish. Below, we’ll walk you through the typical number of coats and offer tips for each stage of the process.
The Basics of Drywall Mudding
Drywall mud is applied to cover the seams between drywall sheets, as well as to conceal screws, nails, and other imperfections. The goal is to create a perfectly smooth, even surface that’s ready for priming and painting. Here’s the general process for mudding drywall:
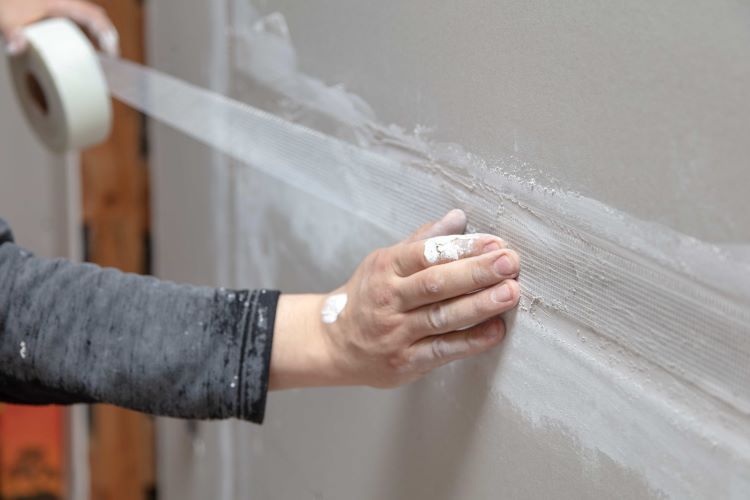
- Taping the Seams: The first step is embedding drywall tape into the seams between the drywall sheets using a layer of mud. This helps reinforce the joints and prevents future cracking.
- Applying Multiple Coats: Once the tape is set, multiple coats of mud are applied, each one being sanded and smoothed before the next. Each layer serves to gradually build up a smooth surface.
- Final Sanding: After the last coat has dried, the surface is sanded to perfection before priming and painting.
How Many Coats Are Needed?
Typically, drywall finishing requires three coats of mud to achieve a smooth, professional finish. However, some situations may call for additional coats. Here’s a breakdown of the typical stages:
1. First Coat (Tape Coat)
The first coat is applied after taping the seams. A thin layer of joint compound is spread over the tape to embed it into the drywall. This coat fills in the gaps and covers fasteners like screws and nails. It’s important to keep this coat as thin as possible since it’s mainly for embedding the tape, not for smoothing out the surface.
- Tips: Use all-purpose or quick-setting mud. Smooth the mud evenly, and wipe away excess for a thin, clean coat. Allow it to dry fully before moving on.
2. Second Coat (Filling Coat)
The second coat is your first real chance to smooth out the surface. This coat is applied over the seams and fasteners, gradually widening the coverage area to blend it with the surrounding drywall. You’ll want to feather the edges so the transition between the mud and drywall is invisible.
- Tips: Use a wider drywall knife (8-10 inches) for this coat. Apply the mud smoothly and avoid ridges or lines. Let this coat dry thoroughly before sanding lightly to knock down any high spots.
3. Third Coat (Finishing Coat)
The final coat should be the smoothest and thinnest. This coat is designed to perfect the surface, filling in any remaining imperfections and ensuring a seamless transition between the mudded areas and the drywall. This coat is key to achieving a flawless finish.
- Tips: Use a 12-inch or wider knife for this coat to cover a larger area with fewer strokes. Keep the mud thin and smooth, focusing on blending everything together for an even surface.
4. Sanding and Final Touches
Once the final coat is dry, the surface should be lightly sanded to eliminate any remaining imperfections. After sanding, wipe the walls down with a damp cloth to remove dust and prepare the surface for priming.
- Tips: Use fine-grit sandpaper (180-220) and avoid over-sanding, which can expose the drywall tape.
When Are Additional Coats Needed?
While three coats are generally sufficient for most drywall projects, some situations may require additional coats. Here’s when you might need more than three coats:
- Dealing with uneven surfaces: If the drywall was installed unevenly, additional coats may be needed to level out the surface.
- Fixing mistakes: If previous coats were not applied smoothly or dried with ridges, additional coats can help fix imperfections.
- Textured finishes: If you’re going for a textured finish, you may need more coats to build up the desired texture and achieve consistency.
Professional Drywall Finishing in Calgary
At Calgary Drywallers, we pride ourselves on delivering smooth, flawless drywall finishes for homes and businesses across the Calgary area. Applying the right number of coats of drywall mud is crucial to achieving that perfect, seamless look. Whether you’re finishing new construction or repairing existing drywall, our team of experts ensures every project meets the highest standards of quality.
Conclusion
Achieving perfect drywall isn’t just about how many coats of mud you apply, but also about using the right techniques and materials for each coat. While three coats are standard, the condition of the drywall and your desired finish may affect the process. For a professional finish, it’s always a good idea to consult with drywall experts who understand the ins and outs of drywall mudding.
Need help with your drywall finishing project in Calgary? Contact Calgary Drywallers today to get a seamless, high-quality result that will leave your walls looking perfect!
You might also like